How to Organize Under Kitchen Sink With Bins and Smart Zones
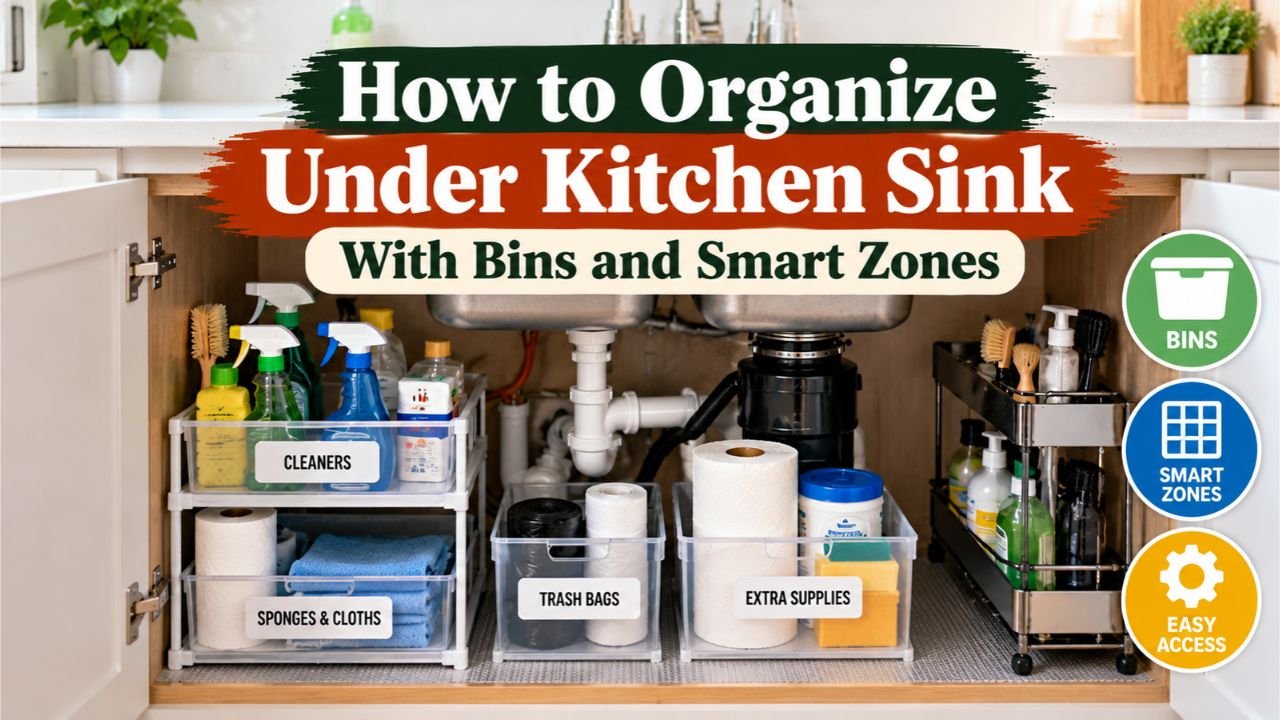
The easiest way to organize under your kitchen sink is to empty the cabinet, remove unnecessary items, and arrange the remaining supplies in removable bins around the plumbing. Keep frequently used products near the front, use vertical storage where possible, and leave enough room to inspect pipes and shutoff valves.
The space beneath a kitchen sink is more challenging to organize than an ordinary cabinet. Drainpipes, water supply lines, garbage disposals, and sometimes water filtration systems take up valuable room. Awkward corners and deep cabinets can also make everyday supplies difficult to reach.
Without a practical storage system, cleaning bottles get pushed behind other products, sponges disappear, and unused supplies gradually accumulate. Even a large cabinet can feel crowded when everything sits directly on the floor.
A well-organized under-sink area should make daily cleaning easier without creating plumbing or safety problems. With the right containers, storage zones, and layout, even a small cabinet can hold essential supplies neatly. The following steps explain how to arrange the space, choose suitable organizers, prevent moisture problems, and maintain an accessible setup.
How to Organize Under Kitchen Sink in 7 Simple Steps
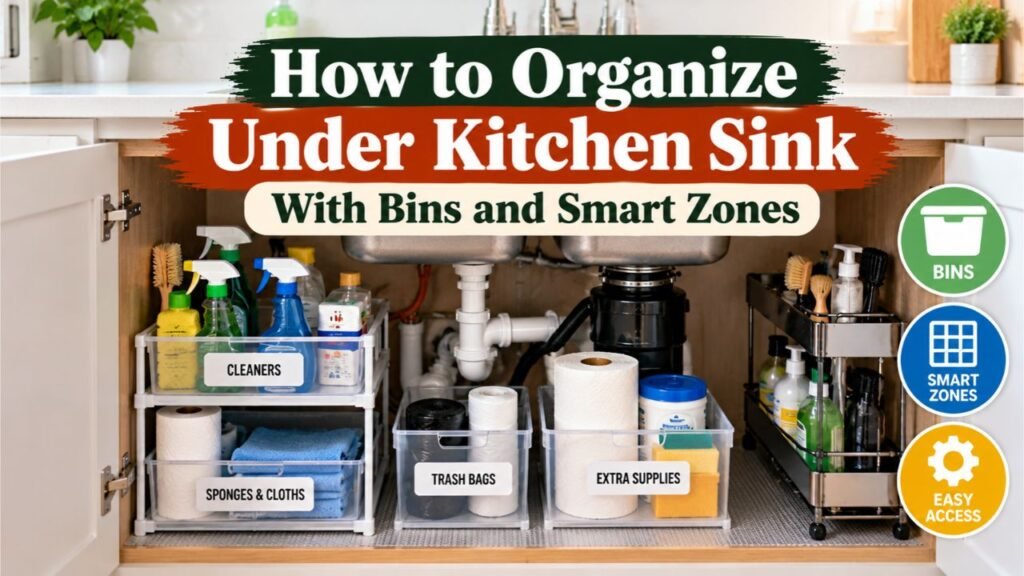
Organizing the cabinet beneath your sink becomes easier when you work with the available space rather than trying to fill every corner.
Follow these seven steps to create a practical arrangement.
Step 1: Empty the Entire Under-Sink Cabinet
Remove everything from the cabinet, including cleaning products, sponges, trash bags, brushes, and storage containers.
Place the items on a countertop or another protected surface where you can inspect them.
As you empty the cabinet, look for:
- Empty or nearly empty cleaning bottles
- Duplicate products you rarely use
- Damaged containers or leaking lids
- Old sponges and worn-out cleaning brushes
- Unnecessary packaging
- Items that belong in another storage area
Keep only the products that serve a clear purpose in this space.
Avoid putting items back simply because they were previously stored there. Reducing unnecessary supplies creates more usable space than adding extra organizers.
Step 2: Clean and Inspect the Cabinet Interior
Before installing organizers, wipe down the cabinet floor, side walls, and door interiors.
Use a cleaning method appropriate for the cabinet material and dry the surfaces completely.
Inspect the area around the drainpipe, water supply connections, and cabinet corners.
Look for:
- Water stains or swollen cabinet panels
- Damp spots beneath plumbing connections
- Mold or mildew
- Rust around metal fittings
- Loose or damaged cabinet liners
- Unusual odors
If you notice active dripping, address the plumbing problem before returning your belongings.
Do not cover an existing leak with a storage mat or plastic liner. A liner may help contain minor drips, but it cannot replace a plumbing repair.
Step 3: Sort Under-Sink Supplies Into Categories
Group the products according to their actual use.
For example:
- Daily cleaning: Dish soap, dishwasher-safe cleaning tools, and frequently used surface cleaners
- Scrubbing supplies: Cleaning brushes, scrub pads, and replacement sponges
- Waste supplies: Trash bags and recycling liners
- Occasional cleaning: Specialty products needed less frequently
- Reusable accessories: Household cleaning gloves and dry microfiber cloths
Separate products that require special storage conditions or safety precautions.
This sorting process helps determine how many containers you actually need.
Step 4: Measure Around the Sink Plumbing
Measure the interior width, depth, and height of the cabinet.
However, do not rely on the cabinet’s overall dimensions alone. Pipes, fittings, and disposal units reduce the usable storage area.
Measure the open spaces on both sides of the plumbing and check how far organizers can extend toward the cabinet doors.
Pay attention to:
- Drainpipe placement
- Shutoff valve locations
- Water supply hoses
- Garbage disposal dimensions
- Water filtration equipment
- Door hinges and cabinet framing
For pull-out drawers, also check whether the organizer can slide forward without hitting the door or plumbing.
A storage product that fits the cabinet’s width may still be unusable if it collides with a pipe.
Step 5: Choose Removable Storage Bins
Start with a few simple bins instead of purchasing an entire collection of organizers.
Removable containers offer several advantages:
- Supplies stay grouped together.
- Small items are less likely to disappear.
- Cleaning the cabinet floor becomes easier.
- Products can be removed quickly for plumbing access.
- The arrangement can change when storage needs change.
Choose washable containers that can handle occasional moisture.
Clear plastic bins make it easier to identify contents, while handled caddies are useful for supplies that regularly move between rooms.
Avoid overcrowding the cabinet with containers that leave no room to reach behind them.
Step 6: Arrange Supplies by Frequency of Use
Position frequently used items near the cabinet opening.
Keep less frequently used supplies toward the back or in accessible side compartments.
For example, a practical arrangement might place:
- Dish soap and everyday cleaning supplies toward the front
- Scrub brushes and replacement sponges in a separate bin
- Trash bag rolls along an open side
- Occasional cleaning accessories in a rear container
- Lightweight cleaning tools on suitable door-mounted holders
Keep the plumbing shutoff valves accessible.
The goal is to reach everyday supplies without moving several other items first.
Step 7: Test the Arrangement Before Finishing
After arranging everything, open and close both cabinet doors.
Pull out each bin and check whether it moves freely.
Make sure organizers do not interfere with pipes, hoses, cabinet hinges, or disposal equipment.
Try retrieving the items used most often.
If reaching a common product requires removing another container, adjust its position.
A successful under-sink organization system should be easy to use, not simply attractive when the doors are open.
Choose Under-Sink Organizers That Fit Around Plumbing
The best under-sink organizers are not necessarily the largest. Their usefulness depends on the cabinet layout, available clearance, and types of supplies being stored.
Different organizers solve different storage problems.
| Organizer Type | Best Use | Main Consideration |
| Clear plastic bins | Grouping bottles and small supplies | Select sizes that fit beside pipes |
| Handled cleaning caddies | Portable everyday cleaning supplies | Keep weight manageable |
| Two-tier pull-out organizers | Using open vertical space | Check plumbing and door clearance |
| Adjustable under-sink shelves | Creating storage around drainpipes | Verify shelf configuration and stability |
| Cabinet door organizers | Holding lightweight accessories | Avoid hinges and plumbing interference |
| Small vertical dividers | Storing flat or narrow cleaning tools | Secure items against tipping |
Use Stackable or Two-Tier Organizers Carefully
Vertical storage can make a significant difference when the cabinet has unused height.
A two-tier organizer may hold spray bottles on the bottom and smaller accessories above.
However, upper shelves must fit around the sink basin and drain assembly.
Avoid placing tall or heavy products on unstable upper shelves. Containers should remain secure when a drawer slides or the cabinet door closes.
A narrow two-tier unit on one side of the plumbing often works better than a full-width organizer.
Use Pull-Out Bins for Deep Cabinets
Deep under-sink cabinets can make products at the back difficult to reach.
Pull-out storage brings items forward without requiring you to reach around plumbing.
A removable sliding basket is useful for organizing bottles, brush attachments, and small cleaning accessories.
Before purchasing one, confirm that its full travel path is clear.
Also consider whether the unit can be removed easily if plumbing maintenance becomes necessary.
Add Storage to the Inside of Cabinet Doors
Cabinet doors often provide unused storage space.
Depending on the door design, small racks or suitable adhesive hooks may hold lightweight items such as cleaning gloves or a small brush.
Avoid hanging heavy bottles from weak adhesive hooks.
Check that the organizer will not strike the sink basin, nearby pipes, or interior shelves when the door closes.
Pro Tip: Before attaching a door organizer permanently, hold it in the intended position and close the cabinet door slowly. This simple check helps prevent clearance problems.
Divide the Under-Sink Cabinet Into Practical Storage Zones
A good arrangement gives every type of supply a predictable location.
Instead of treating the cabinet as one large storage compartment, divide it into smaller zones according to accessibility and available space.
Keep Everyday Cleaning Supplies Near the Front
The front section is the most convenient place for items used regularly.
A small removable caddy may hold dish soap, a general-purpose cleaner, and a cleaning brush, provided the products can be stored together safely.
Position the caddy where it can be removed without reaching behind the drainpipe.
Keep bottles upright to reduce the chance of leakage.
Avoid storing multiple backup bottles in the same front section if they make everyday items difficult to reach.
Use Side Spaces for Tall and Narrow Products
The vertical spaces beside the drain assembly are often useful for storage.
A narrow bin can hold tall bottles, while a small basket may accommodate spare brushes and cleaning accessories.
Try to match the container shape to the available space.
For example, a tall narrow organizer may fit beside a garbage disposal where a wide storage drawer cannot.
Do not force containers between plumbing connections or flexible hoses.
Reserve the Back for Less Frequently Used Items
Rear storage works well for lightweight supplies that are not needed every day.
Possible examples include extra trash bags, replacement cleaning brushes, or a small collection of seasonal cleaning accessories.
Place these items in removable containers rather than stacking them loosely.
Anything stored toward the back should still be easy to remove when plumbing needs inspection.
Keep Smaller Accessories Together
Small items frequently create clutter because they do not stack neatly.
Instead of leaving them scattered across the cabinet floor, use a divided basket or compact container.
Useful categories include:
- Replacement scrub pads
- Spare dish brushes
- Dry cleaning gloves
- Small cleaning attachments
- Unused sponge replacements
Keep wet accessories separate from dry supplies.
Used sponges and damp cloths should be allowed to dry in a suitable ventilated location rather than being sealed inside a damp container.
Organize Under-Sink Cleaning Products Safely
Cleaning product storage requires more attention than ordinary household accessories.
Some products can be hazardous if swallowed, spilled, or mixed with incompatible chemicals.
An organized cabinet must also be a safe cabinet.
Keep Hazardous Products Away From Children
The area under a kitchen sink is often within easy reach of young children.
The American Academy of Pediatrics’ kitchen safety guidance recommends keeping dangerous cleaning products in a high, locked cabinet and out of sight.
If hazardous products must be kept under the sink, it recommends an automatically fastening child safety lock.
A high, locked location is the better choice for dangerous cleaners in homes with young children. An ordinary under-sink bin does not provide child protection.
Consider pet access as well, especially if a curious animal can open cabinet doors.
Keep Cleaning Chemicals in Their Original Containers
Avoid transferring cleaning chemicals into decorative bottles or food containers.
Original packaging provides important information about handling, ingredients, warnings, and appropriate use.
Before returning a product to storage:
- Check that its original label is readable.
- Inspect the bottle for damage or leakage.
- Close the cap securely.
- Place the container upright.
- Follow any storage instructions printed on the label.
Do not store incompatible products where a leak could allow them to mix.
Separate Bleach From Incompatible Cleaners
Bleach requires particular care because mixing it with other cleaning chemicals can create dangerous fumes.
According to the CDC’s cleaning and disinfecting guidance, household bleach and other disinfectants should never be mixed with other cleaners or disinfectants.
For under-sink organization, avoid placing bleach and incompatible cleaners together in a bin where spilled liquids could combine.
Follow each product’s storage instructions and keep containers securely closed.
If the cabinet is crowded or prone to leaks, move hazardous cleaners to a more suitable secured storage location.
Avoid Storing Food and Household Chemicals Together
The cabinet beneath a sink is generally better suited to appropriate cleaning accessories than food storage.
Food packaging, pantry supplies, medications, and cooking ingredients should be kept elsewhere.
A separate storage location helps protect these items from accidental chemical spills, dampness, and plumbing leaks.
Similarly, avoid keeping delicate electrical appliances directly beneath plumbing where leaked water could damage them.
Protect the Under-Sink Cabinet From Moisture and Leaks
Under-sink storage must account for the possibility of water escaping from plumbing connections.
Even a slow leak can damage cabinet materials and stored belongings if it goes unnoticed.
Install a Suitable Waterproof Cabinet Mat
A removable waterproof mat or properly sized drip tray can help protect the cabinet floor from minor spills.
Look for a material that is easy to wipe clean and remove for inspection.
A raised-edge mat may help contain a small amount of water, but its capacity depends on its size and design.
Choose one that fits without covering important plumbing access points.
A waterproof liner helps protect the cabinet surface, but it does not repair a leaking pipe.
If water collects repeatedly, locate and correct the source rather than relying on the liner.
Leave Plumbing Connections Accessible
Avoid packing containers directly against drainpipes or supply valves.
A plumber or homeowner should be able to inspect connections and reach the water shutoff valves when needed.
There is no single storage clearance measurement suitable for every under-sink installation.
Instead, keep enough room to:
- Reach the shutoff valves
- Inspect visible pipe connections
- Remove bins without disturbing plumbing
- Notice water collecting around fittings
- Access filtration equipment when maintenance is required
Removable organizers are especially helpful because they allow the cabinet to be cleared quickly.
Prevent Damp Sponges and Cloths From Creating Odors
Wet sponges, cleaning cloths, and brushes can introduce moisture into enclosed storage.
Avoid sealing damp items inside plastic bins.
Allow reusable cleaning tools to dry properly before storing them.
If you notice a musty odor, remove the contents and inspect the cabinet for moisture.
Check for hidden leaks, wet liners, and damaged cabinet materials rather than trying to cover the smell with air fresheners.
Persistent sewer-like odors may indicate a plumbing issue that needs attention.
Make Small and Awkward Under-Sink Cabinets More Functional
Not every kitchen has a large open cabinet beneath the sink.
The most suitable layout changes depending on cabinet width, sink configuration, and installed equipment.
Organizing a Small Under-Sink Cabinet
In a narrow cabinet, prioritize accessibility over storage capacity.
Use one compact caddy for frequently used products and a separate narrow bin for small accessories.
Avoid purchasing a large organizer before measuring the available space.
A few well-sized containers can be more useful than a large shelving system that crowds the plumbing.
Door-mounted storage may help with lightweight items when adequate clearance is available.
Keep bulk replacements in another storage location when possible.
Organizing Under a Sink With a Garbage Disposal
A garbage disposal occupies additional vertical and horizontal space.
It may also have an electrical connection and associated plumbing that require access.
Use open areas beside the disposal rather than forcing shelves directly underneath or around it.
A practical arrangement might include:
- A narrow removable bin on one side
- A small cleaning caddy in the front
- Lightweight accessories in an open side compartment
Do not place storage items against electrical connections or interfere with the disposal’s maintenance access.
Organizing a Deep Under-Sink Cabinet
A deep cabinet can hold more supplies, but items placed toward the back may become difficult to retrieve.
Use a combination of front-access containers and removable rear bins.
Keep everyday products close to the door.
If using pull-out shelves, verify that they extend far enough to make stored items accessible without contacting the plumbing.
Avoid stacking several loose containers in front of each other.
Organizing Under a Double Kitchen Sink
Double-basin sinks may leave less uninterrupted vertical space because of their drain assemblies.
Identify the areas with the greatest usable height before choosing organizers.
Short bins beneath the basin areas and narrow storage beside the drainpipes may provide a better fit than tall shelving.
Keep the center plumbing area accessible for maintenance.
What Should You Avoid Storing Under the Kitchen Sink?
Not everything that fits beneath a sink belongs there.
Some belongings are better kept in a dry cabinet, secured utility closet, or another designated storage location.
| Item | Reason to Store Elsewhere |
| Food and pantry ingredients | Potential exposure to leaks and cleaning chemicals |
| Medications | Storage conditions and accidental access concerns |
| Delicate electrical appliances | Possible water damage |
| Important documents | Moisture and spill exposure |
| Large quantities of paper products | Can absorb water from leaks |
| Dangerous cleaning chemicals | Safer in a high, locked cabinet, especially around children |
| Products requiring special storage | May not tolerate moisture or cabinet conditions |
These recommendations depend on the household and the products involved.
For example, a small supply of trash bags can be convenient under the sink, while several bulky packages may take up too much valuable space.
The objective is to reserve the cabinet for items that are suitable for its conditions and genuinely useful near the sink.
Maintain an Organized Under-Sink Cabinet
Once the cabinet is organized, maintaining it should require little effort.
The most effective approach is to keep the arrangement simple and inspect it periodically.
Return Supplies to Their Assigned Containers
After cleaning, return bottles, brushes, and accessories to their designated storage zones.
Avoid leaving newly purchased supplies directly on the cabinet floor.
If a container becomes overcrowded, check whether any products are empty, duplicated, or no longer needed.
Check for Leaks and Unused Products Monthly
A brief monthly inspection helps catch problems before they become harder to manage.
During the check:
- Remove any empty containers.
- Wipe up spills.
- Check for dampness and visible leaks.
- Inspect bottle caps and packaging.
- Remove worn-out cleaning accessories.
- Confirm that plumbing valves remain accessible.
If something smells unusual or the cabinet floor feels damp, investigate immediately rather than waiting for the next scheduled check.
Avoid Buying More Organizers Than Necessary
An under-sink cabinet does not need to be filled completely.
Unused space makes it easier to remove supplies, clean surfaces, and inspect plumbing.
When new products are added, reorganize existing containers before purchasing another shelf or basket.
A simple arrangement with three functional bins can be more practical than a complicated system containing numerous compartments.
Conclusion
Understanding how to organize under kitchen sink space starts with recognizing its limitations. Plumbing, cabinet dimensions, moisture exposure, and cleaning product safety should guide the storage layout.
Begin by removing unnecessary supplies and inspecting the cabinet. Use removable bins to group everyday items, position frequently used products near the front, and select organizers that fit around the pipes.
For households with children, keep hazardous cleaning chemicals in a high, locked location whenever possible. Make sure plumbing connections and shutoff valves remain accessible.
The best under-sink organization system is one that keeps essential supplies easy to reach, protects the cabinet, and stays manageable during everyday use.
FAQs About How to Organize Under Kitchen Sink
What Is the Best Way to Organize Under a Kitchen Sink Without Shelves?
Use removable plastic bins, handled caddies, and suitable cabinet door organizers. These options group cleaning supplies without requiring permanent shelving.
Place frequently used products toward the front and use narrow containers beside plumbing to make better use of the available space.
Can You Put a Trash Can Under the Kitchen Sink?
Yes, a trash can can fit under a kitchen sink if the cabinet has enough clearance and the container does not block plumbing access.
Choose a size that allows the doors to close properly. A removable or suitable pull-out trash bin can make everyday use easier, especially in a small kitchen.
How Do You Organize Under a Kitchen Sink With Pipes in the Way?
Measure the clear areas around the pipes and choose narrow bins, adjustable shelves, or organizers with plumbing cutouts.
Keep shutoff valves and connections accessible. Avoid forcing storage units against pipes or supply hoses.
Are Pull-Out Organizers Better Than Regular Storage Bins?
Pull-out organizers can be more convenient in deep cabinets because they bring supplies closer to the opening.
Regular removable bins are often better for irregular spaces, especially when plumbing occupies much of the cabinet. The better option depends on available clearance and how frequently you need to remove the stored supplies.
Can You Store Pots and Pans Under the Kitchen Sink?
Pots and pans may fit physically, but the space beneath a sink is usually not the preferred location.
Moisture, plumbing leaks, and nearby cleaning chemicals make a separate dry kitchen cabinet a more suitable choice for cookware.
If storing cookware under the sink is unavoidable, keep it separated from chemicals and protected from potential leaks.
How Do You Keep an Under-Sink Cabinet From Smelling?
Remove damp cleaning accessories, wipe up spills, and inspect the cabinet for leaks or moisture damage.
Allow washed containers and cabinet surfaces to dry completely before replacing them. If the odor continues, inspect the plumbing and look for hidden moisture or drain-related problems rather than using fragrance to conceal the smell.